Hi everyone! Thanks so much for following my blog here for a few years. I decided to move my blog to it’s own url, so I would love it if you would follow me at my new location: Dinglefoot’s Crafty Blog. See you over there! 🙂
Author Archives: Deborah Leaverton

Delightful Daisy Happy Birthday Card

Remember the daisy from last week? This week, I took it, and along with a very few other pieces, I made a fun birthday card for someone later this week :). The brown pieces are embossed and matted onto glitter cardstock. I also cut a swirl from a Cricut Cartridge, and the whole thing went together very easily and quickly. See the video below for complete instructions. Thanks so much for stopping by!
Share this:

Make Your Own Handmade Daisies

It can be tiresome sorting through jars and packages of flowers, only to find that you don’t have any that are the perfect color for your project. Why not make your own? It’s not as hard as it looks. You will always need some sort of flower die cuts for the petals, and then something for the center, and perhaps a few leaves. The flower I’m showing you this week has 3 plain daisy shaped die cuts for the petals, and then 4 spiky sun shapes for the middle — you could also substitute a smaller flower for the center. Ready to do this? You’ll be amazed how easy it is!
Share this:

Thanks So Much Ribbon Handmade Card

Ok, so I need to quit making my projects sideways (camera set up isn’t great), and late at night lol! My ribbon is kind of skewed in a couple of places, but you get the idea and you can make yours straight :). I found my glitter paper that I like, then went to see if I had any ribbons to match the colors, and came up with several. Then I punched flowers from the glitter paper and put rhinestones in the centers. My tag was made by stamping and then cutting around the image, and matting it onto the dark brown paper. The base card is also dark brown, and the embossed paper is Kraft paper, the same as the tag. Thanks so much for stopping by!
Share this:

Blue & Brown Butterflies and Bows Card

Happy Labor Day everyone! Do you have to work today? I know we don’t have today off for my family, so I guess we’ll just celebrate that we can work? 🙂
In this week’s card, I use very simple things to make a lovely look! First of all, I started with a 1″ circle punch, then then a strip of paper the length of the card and about 1″ wide. My tag size was made by choosing the stamp I was going to use first. Then all the other papers were just cut slightly larger each time and layered. I used a flat back jewel butterfly and 2 bows for an accent. That’s it! Not very labor intensive! Have a wonderful day and thanks so much for stopping by!
P.S.: Do you ever take card ideas and transfer them to your scrapbook pages?
Share this:

Peeking Birthday Fairy Handmade Card

This is a very simple card, and would be fun for a child’s birthday card. The fairy stamp is one I had from an Inkadinkado stamp set, but you could use different things like butterflies, princesses, even cat or dog stamps, die cuts, or stickers — anything that would look neat peeking out. I also used a heart brad to hold down the flap of paper, just because it matched the paper I had. If you would like the full instructions, there’s a video below. Thanks so much for stopping by!
Share this:

Elegant Happy Anniversary Card

I made an anniversary card this week for my aunt and uncle. It was actually their 50th anniversary, so I wanted something a little more sparkly, but not too overdone either. I made the die cut on my cricut, and the “Happy Anniversary” is just a peel-off sticker. The longest thing to make was the die cut, and of course you know that an electronic machine doesn’t take too long to do it’s job :).
Afterwards at the end of the video, I show how I finished the inside…a very easy task. Just grab some elements from the front to put inside, and you will have a completed card in no time! Thanks for stopping by!
Share this:

So Happy For You Handmade Baby Card

I’m not sure what to think about the way this card turned out. I think maybe the swirl needed to be a different color? Maybe popped up? I definitely could have stamped the greeting straighter lol…oh well, I’ll call it a prototype and change it a bit if I redo it. :D. You know…just one of those weeks…
If you’re interested, the video is below. I cut the 2 white papers and the dotted paper at 4″ x 2″, and embossed the white paper, then edged them with a Fiskars Edge Punch. The swirl is from Cricut’s Cindy Loo, and then there’s a run-of-the-mill blue button. Thanks for stopping by!
Share this:

Double Embossing Technique for Paper Crafts

Phooey…I was working on things in the car yesterday while we were traveling (no, I wasn’t driving LOL), and just realized that the pic is a bit blurry, but hopefully you can still see the idea. I stamped and embossed a design in gold on the red cardstock first, then I embossed it with an embossing folder afterwards. I like the look because it gives the card extra texture and interest. I finished off the design with peel-off corner and word stickers. You can see the video below for details. Thanks so much for stopping by!
Share this:

Masking Tape Background Technique for Paper Crafts
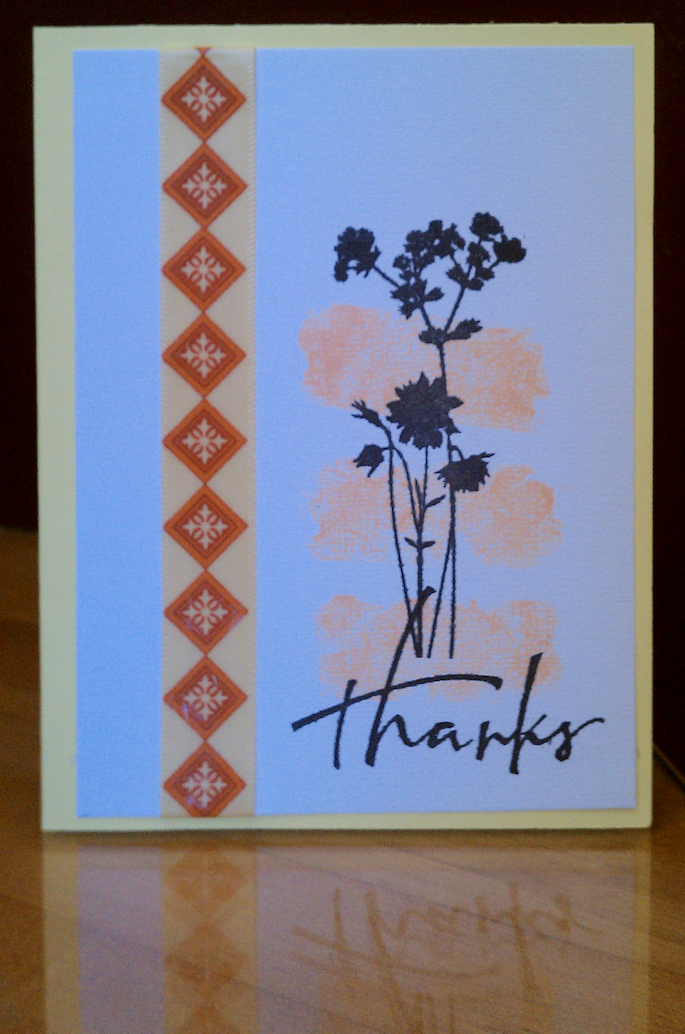
Sometimes it’s fun to grab something you have around the house and use it for another purpose. Such is the idea behind this week’s project. I saw a neat background on a project, and hunted it down to find out how it was done. The best part is that it’s done with masking tape, or painter’s tape, and it’s super duper easy and customizable to any project just by changing the ink colors and/or the width and length of the tape.
For the rest of the card, I used a length of ribbon, a flower stamps, and a thanks stamp. See the video below for complete instructions. Thanks so much for stopping by!

